
Data export
We recommend using an internet browser on a computer. This article explains how to:
- Open the export window for one or more participants
- Choose what to export:
- Raw data — accelerometer data before post-processing
- Derived data — summarised activity data
- Reports — visual PDF reports
- Export the file
- Download data to your device
Open the export window#
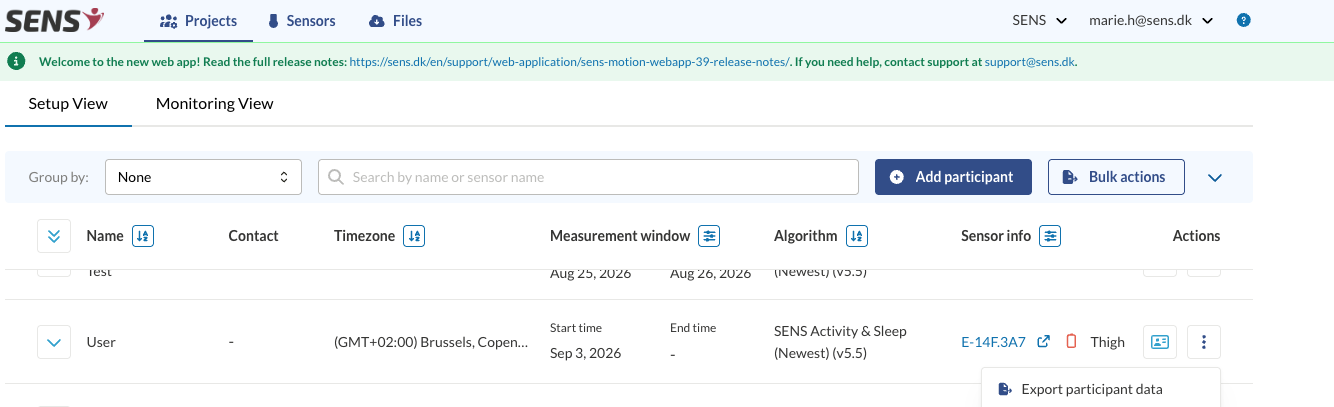
You can export from the Participants overview in your project. Exporting works the same way in both Setup View and Monitoring View. Use the participant row menu for a single participant, or Bulk actions for several participants at once.
Export for one participant#
Open the project and go to the Participants overview.
Open the actions menu (three dots) on the participant row and select Export participant data. The export window opens.
Export for several participants#
- In the Participants overview, click Bulk actions. Checkboxes appear next to each participant.
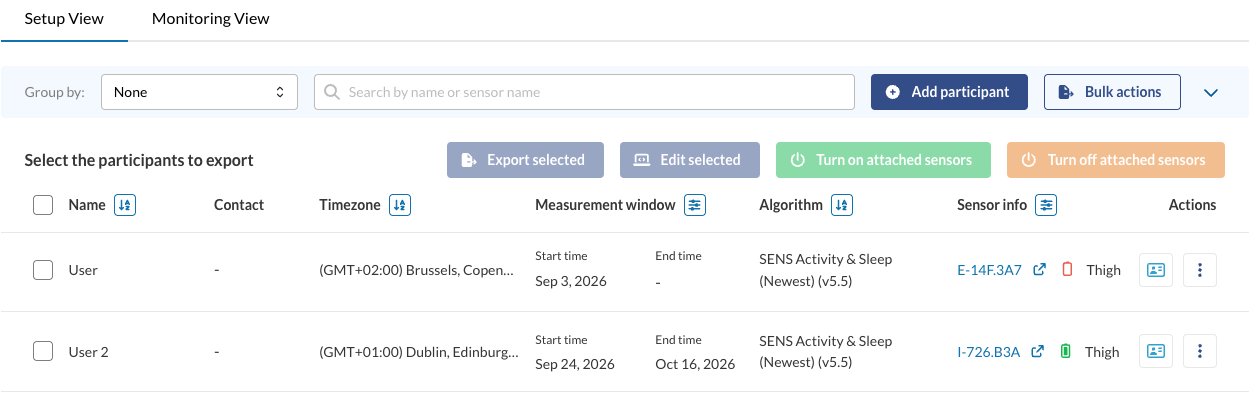
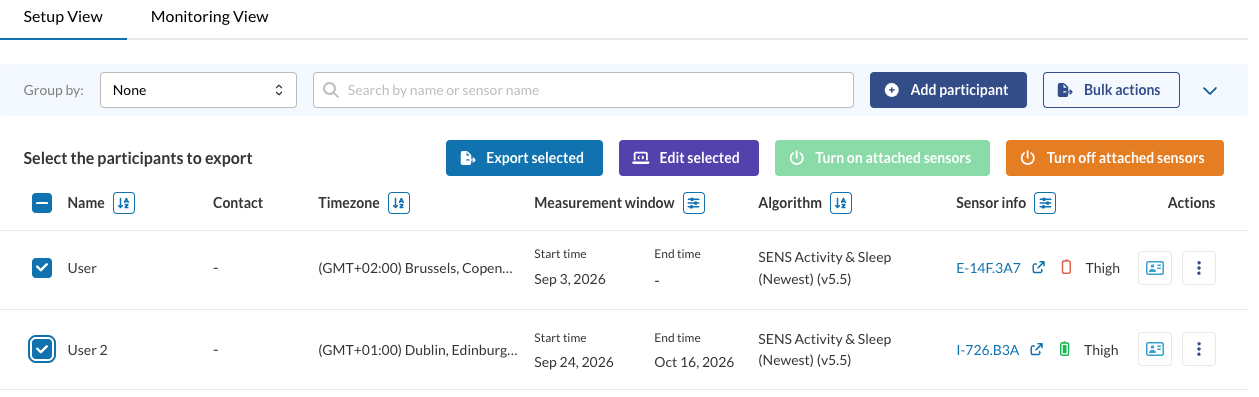
- Select the participants you wish to export data for, using the top check box to select all or ticking individual participants. Then click Export selected. The export window opens.
Choose what to export#
The Export Participant Data window has the same layout for every data type:
Data type — at the top, choose Raw Data, Derived Data or Reports.
Export Period — enter a Start time and End time, or click Use measurement period to fill in the participant’s measurement window.
Settings for the data type — the panel to the right of the export period changes with the data type you chose.
Customize file export — the panel below sets how the file is written, such as timestamp columns, file format and number format.
The options available depend on your project type (SENS, NFA, DEMOS or ErgoConnect). The sections below describe each data type.
Raw data#
Raw Data is measurement data before post-processing, i.e. the raw accelerometer data. When you export from the Participants overview, the data is exported per participant.
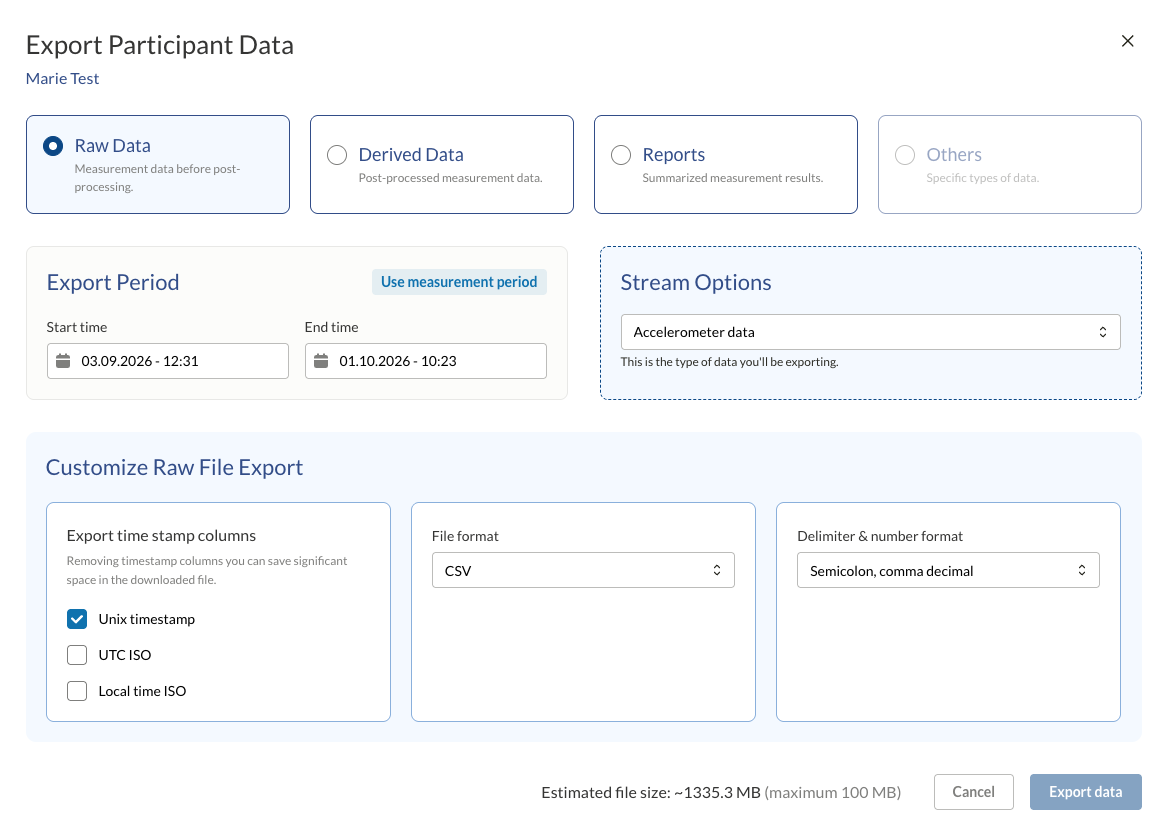
Under Stream Options, choose the type of data to export, for example Accelerometer data.
Under Customize Raw File Export, first choose the File format:
- CSV — best for spreadsheets and general use.
- Binary — compact packed samples, for use with your own tools (Python, R or similar). Read more about the binary file format here.
If you choose CSV, two more options appear:
- Export time stamp columns — Unix timestamp, UTC ISO and/or Local time ISO. Leaving out timestamp columns you don’t need can reduce the file size significantly.
- Delimiter & number format — how columns and decimals are written: Semicolon, comma decimal or Comma, dot decimal.
Binary has no further options. Each sample always includes a Unix timestamp.
Estimated file size is shown at the bottom of the window, with the maximum next to it. Raw data files are large, and the limit is based on file size, not on a number of days. If the estimate is above the maximum, the Export data button is unavailable — as in the screenshot above, where the estimate is about 1335 MB against a maximum of 100 MB. To get below the limit, shorten the export period, remove timestamp columns from a CSV export, or choose Binary, which gives the smallest file.
Derived data#
Derived Data is measurement data processed by the SENS algorithm and summarised into activity categories. This is the format most people use for further analysis in Excel, R or similar.
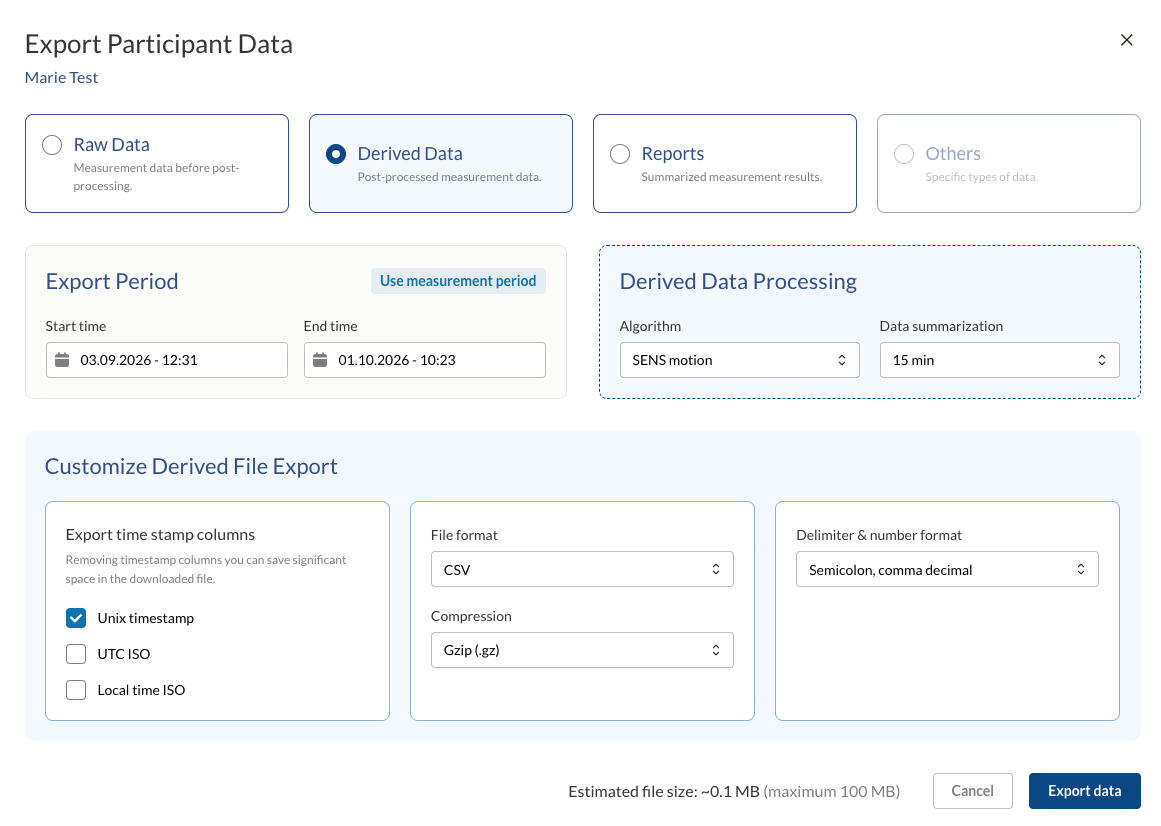
Under Derived Data Processing, choose:
- Algorithm — the algorithm used to process the data, for example SENS motion.
- Data summarization — 15 min, 1 hour or Not summarised. With 15 min and 1 hour, the data is summarised as time per activity category in each interval. Not summarised gives the processed data without summarising it into intervals, which gives the most detail and the largest file. Choose the level of detail that best suits your data processing needs.
Under Customize Derived File Export, choose:
- Export time stamp columns — Unix timestamp, UTC ISO and/or Local time ISO.
- File format — CSV, best for spreadsheets and general use.
- Compression — Gzip (.gz) or None. Gzip makes the downloaded file smaller, but you need to unpack it before opening it.
- Delimiter & number format — how columns and decimals are written: Semicolon, comma decimal or Comma, dot decimal.
Estimated file size is shown at the bottom of the window, with the maximum next to it. Derived data files are usually small, but if the estimate is above the maximum, the Export data button is unavailable. To get below the limit, shorten the export period, remove timestamp columns, or choose a coarser Data summarization, for example 1 hour instead of Not summarised.
If you need help opening the CSV file in Excel, see Making a CSV file readable.
Reports#
Reports are summarised measurement results as visual PDF overviews of the monitoring period.
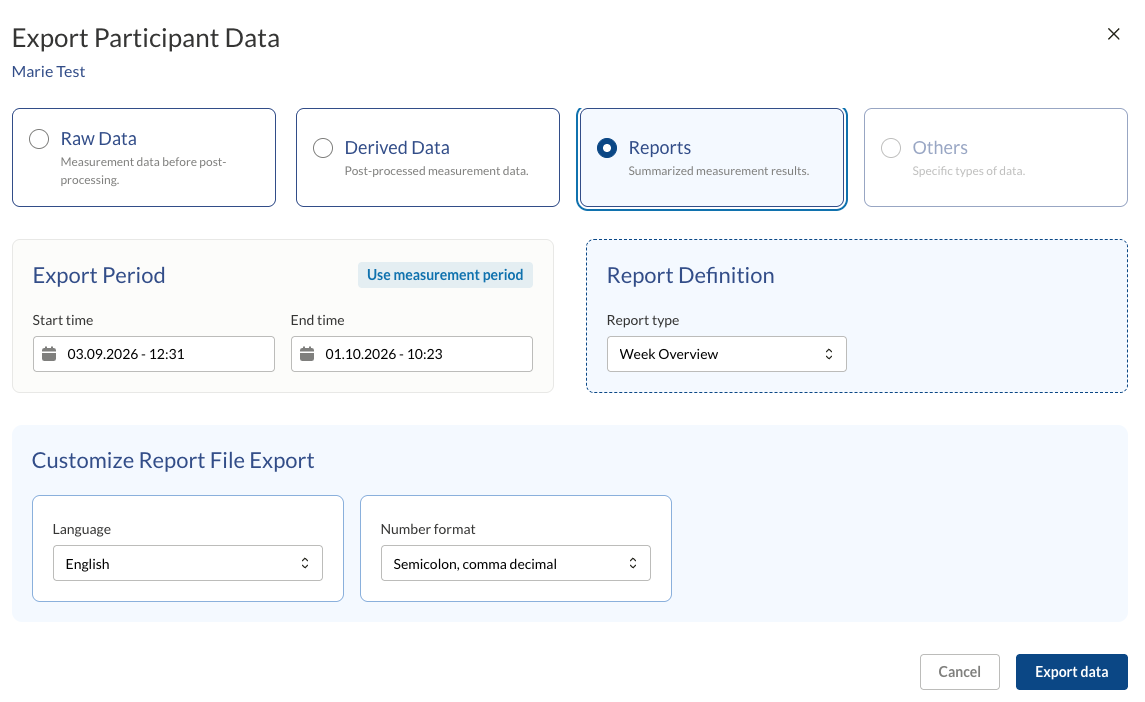
Under Report Definition, choose the Report type:
- Week Overview — an Activity Report with one chart per day, showing how the day was spent in each activity category, hour by hour. Under each chart are the total time per category for that day and the number of steps.
- Average — Feedback on physical activity: the average time per day spent sedentary and at low, moderate and high intensity, during waking hours (the hours used are shown on the report). It includes a summary box broken down by activity, a pie chart, and a bar chart of physical activity per day.
- Combined — the Average report followed by the Week Overview charts, in one PDF.
Under Customize Report File Export, choose:
- Language — the language of the report.
- Number format — how numbers are written in the report: Semicolon, comma decimal or Comma, dot decimal.
Export the file#
When you have chosen your settings, click Export data.
If you recently requested an export with the same settings, the Existing export file window opens instead. Choose:
- Download existing — download the file that was already generated.
- Regenerate — create the file again with the latest data. Choose this if new data may have been uploaded since the file was created.
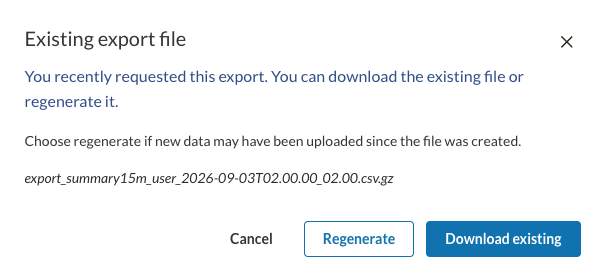
You can now download your files from the Files tab.
Downloading data#
- Click Files in the top menu bar to open the Files Overview. All your exports are listed here.
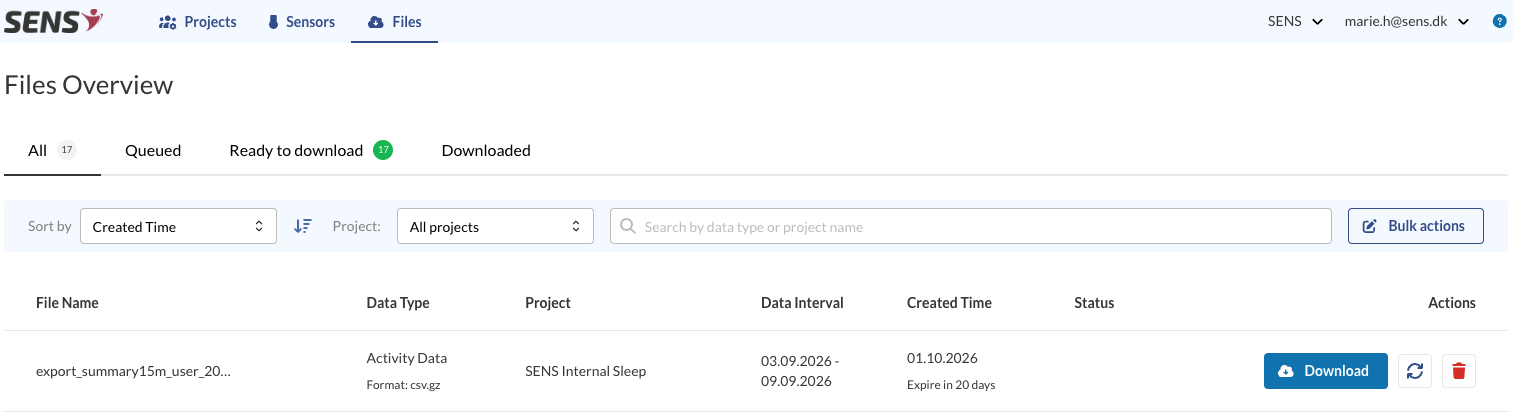
Use the tabs to see All files, files that are Queued for generation, files that are Ready to download, and files you have already Downloaded. You can also sort the list, filter by project, or search by data type or project name. Because files are generated in the background, you can start several exports and download them when they are ready.
- Click Download to download a file to your device. To download several files at once, click Bulk actions and select the files you want.
Each file shows when it was created and when it expires. Download your files before they expire, or regenerate them.